Threads & Canvas
When I first learned Bargello, back in the dark ages, we usually used brown or white
13- or 14-count canvas. Today most stitchers prefer to work on 18-count which comes in many lovely colors. You can choose canvas and threads that complement each other and that will make “show through” less obvious. With Bargello stitches, you will almost always have some show through of canvas threads. This is just about unavoidable with straight stitches. If you are really concerned about it, you can do backstitches over the offending areas after all other stitching is complete, work on colored canvas, or paint the canvas before you begin.
You will want to bind the edges of your canvas with masking tape or you can sew on bias tape. I usually get the bias tape that is already folded and sew it on with a zigzag stitch.
I tend to use masking tape for small and/or short-term projects, and bias tape for large, long-term projects.
There are so many wonderful threads available, I hardly know where to start. For Bargello, you will want threads that work well for longish straight stitches on your desired canvas. Remember that not all threads work for all stitches or on all mesh sizes. You will probably want a doodle canvas so you can try different threads. For a first attempt at these techniques, I usually recommend a wool or wool-blend. Following are just a few of the threads that are suitable for Bargello on 18-count canvas:
Silk & Ivory (wool/silk)
Paternayan Persian (wool), use 2 of the 3 strands
Neon Rays (rayon)
Neon Rays Plus (rayon with metallic)
FyreWerks (metallic), the Soft Sheen is easiest to work with
Floss (cotton or silk), use 4-6 of the 6 strands. Sometimes the darker colors need an extra strand to cover well.
Many other threads will work, such as pearl cottons, Kreinik braids & ribbons, various silks, Watercolors, etc. Experiment! Have fun!
Marking the Canvas
You will have to mark your canvas for any Bargello piece you do – even if it is just to locate the center. And the center is what you will mark first. It is much easier to mark your canvas before you put in on a frame.
It is a good idea to have 2 colors of marking pens. That way, if you make a mistake you can redo it with the second color. I generally use Sharpie Ultra Fine permanent markers in the main color of the threads I will be using. These markers come in lots & lots of colors and are usually colorfast.
A word about colorfastness: Regardless of what it says on the pen, all markers must be tested for colorfastness. Even if it is guaranteed colorfast, there may be one type of canvas where it will bleed. Every time you buy a piece of canvas you must test your marker. A marker may be colorfast on one canvas and not on another. This is primarily due to the sizing in the canvas. Different manufacturers use different types and amounts of sizing. A canvas that is heavily sized is less likely to take the ink of your marker; the ink will just sit on top of the sizing and come right off (on your thread!) the first time it gets wet and sometimes it’ll just rub off as you pull the thread through the canvas. Also, if the canvas is colored, the dye used on the canvas may affect the way the canvas accepts the ink.
To test your marker: Take a scrap of canvas and scribble on it with your marker, making good solid lines – don’t be gentle. Let the ink dry for 10-15 minutes. Then thoroughly wet the canvas under cold running water. Lay the canvas scrap face up on a paper towel (preferably white) and blot with another paper towel. Blot it hard, press down, and don’t just lay it there. If no color (ink) appears on the paper towels you’re safe; use the pen with confidence. On the other hand, if even a tiny dot of color appears on the paper towel, do not use that pen on that canvas! Get another pen that is a different brand, or try a different color. I have found that this holds true with acrylic paints as well. I once had some red acrylic paint that refused to “set”. I had to buy a different brand. Don’t forget, the tested pen is only tested for that particular piece of canvas.
I do not recommend using pencil to mark canvas. The graphite may come off on your thread. No matter how light the pencil mark, light colored threads may look dirty where the marking is.
The only foolproof method of marking canvas is with a basting thread, and even then you must be careful to pull it out just before your stitching gets to it, and clean the area with sticky tape, in order to avoid stray fuzz from contaminating your stitching.
Before you can mark the center of your canvas, you must know whether it will be a hole or an intersection. If your chosen pattern has an odd number of stitches at its center, you will need a hole; if the pattern has an even number of stitches at its center, you will need an intersection. Another way of looking at it is, if the thread count of your pattern is even, there will be a thread at the center and if the thread count is odd, there will be a hole at the center. For example, a pattern that is 20 x 20 stitches is even, center thread; a pattern that is 25 x 25 is odd, center hole.
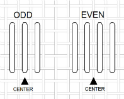
If you only need to mark the center hole of your canvas, the easiest way is to take a short length of thread in a needle, tie a big knot in one end and plunge it through the hole, leaving the knot on top. If you are marking the center threads, make a little stitch over the intersection of threads. You will remove this marking thread as soon as you start stitching.
Bargello Patterns
There are several types of Bargello patterns.
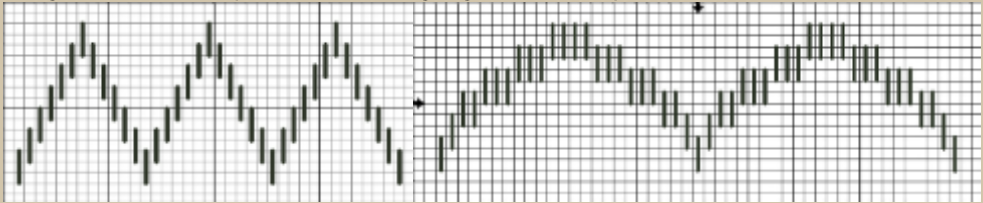
A Linear Pattern is one which travels across the canvas, horizontally or vertically, without forming a motif. Examples would be zigzags and scallops.
Bargello Patterns
There are several types of Bargello patterns.
A Linear Pattern is one which travels across the canvas, horizontally or vertically, without forming a motif. Examples would be zigzags and scallops.
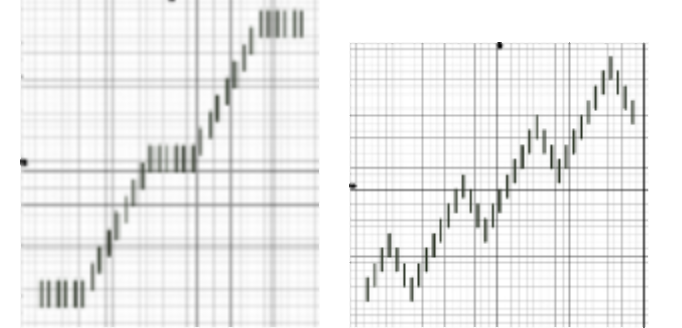
A Diagonal Pattern is one which travels “diagonally” across the canvas, from one corner to another, without forming a motif. It can travel from lower left to upper right, or lower right to upper left. It is not necessarily on a true diagonal, as the angle of slant can vary.
A Unit Pattern is one which does form a motif, such as a diamond, pomegranate, medallion, etc.
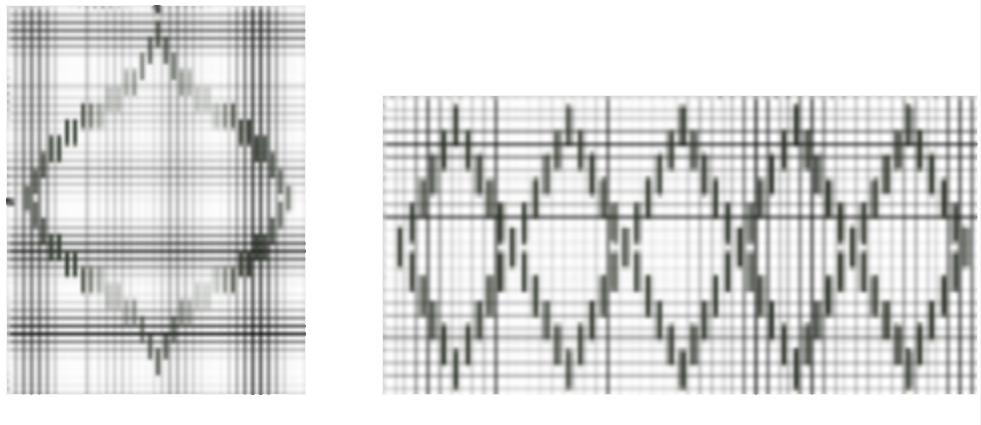
Motifs may be small or large. Some are quite large and could be a central motif for a large canvas.
And then there are the Hungarian Point patterns. These lovely patterns are made up of stitches over both 2 and 6 canvas threads, combined in one pattern. Until you get the hang of them, they can be difficult to stitch.
And then there are the Hungarian Point patterns. These lovely patterns are made up of stitches over both 2 and 6 canvas threads, combined in one pattern. Until you get the hang of them, they can be difficult to stitch.
Stitches & Tension
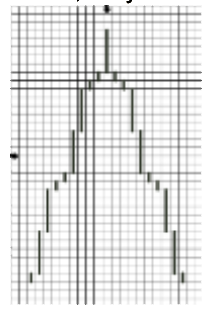
Most Bargello patterns are made up of stitches over 4 canvas threads, a few are over 6. Hungarian Point patterns combine stitches over 2 and over 6. As the pattern progresses, there will be “steps”. For example, in a zigzag pattern stitches may be over 4, with a step of 2, meaning that each stitch begins and ends 2 canvas threads above or below the previous stitch. You will frequently see Bargello patterns described as “stitches over 4 with a step of 2”.
There can also be blocks of stitches, so you might have 4 stitches over 4, step 2, then do 3 stitches over 4.
Your tension should be slightly loose, so that the threads just lay on the canvas. Do not pull your stitches tight as that will accentuate the holes and you don’t want to do that. A tight tension can also cause the canvas to become distorted.
Color
Choosing your colors for Bargello is half the fun!
What is Traditional Bargello? It depends on the time period you are looking at! Since about the beginning of the 20th Century, Bargello has usually been worked in shades of one color, sometimes with a contrasting color. For example, you might see a piece worked in shades of blue, with one red row. But if you go back in time, to say the 17th Century, you will see bargello worked in many different colors and frequently very bright colors. Back then stitchers were quite adventurous!
A few color terms that might come in handy:
“Hue” is the name of the color (red, blue, etc.).
“Value” is the degree of lightness or darkness of the hue.
“Shade” refers to the dark values of a hue. A shade is created by adding black to a hue.
“Tint” refers to the light values of a hue. A tint is created by adding white to a hue.
“Primary” colors are red, blue and yellow.
“Secondary” colors are between the primaries.
They are violet, green and orange.They are created by mixing primaries (red + blue = violet).
“Tertiary” colors are between the primaries and the secondaries, and are created by mixing a primary with its adjacent secondary (red + violet = red/violet).
“Complementary” colors are opposite each other on the color wheel, e.g. red/green
“Analogous” colors are next to each other on the color wheel, e.g. green/yellow green
A “monochromatic” color scheme consists of shades and/or tints of one hue. In needlework, this can be accomplished with different textures as well.
A color wheel is a good, basic tool to have. There are simple ones and complex ones. Whatever suits you is the best one to have! A color wheel can help you decide on color schemes, let you know if you are getting too far afield from your original concept, show you a new concept! The more complex wheels, such as a Quiller wheel, go into more subtle colors and mixes.
Miscellaneous Odds & Ends
For Bargello, count threads (not holes).
Whenever possible, come up through an empty hole and go down through a full one. This will prevent distortion of the threads already on the canvas.
Whenever possible, do not work a straight, upright (Bargello) stitch over only one canvas thread. Rather, lengthen the previous stitch; this often requires paying attention to observe that the next stitch would be over one. Straight stitches over one tend to get lost, sink down, slip under a canvas thread. If you must do an “over one” stitch, it will usually look better if you go over it twice.
Most Bargello patterns are made up of stitches over 4 canvas threads, a few are over 6. Hungarian Point patterns combine stitches over 2 and over 6. As the pattern progresses, there will be “steps”. For example, in a zigzag pattern stitches may be over 4, with a step of 2, meaning that each stitch begins and ends 2 canvas threads above or below the previous stitch. You will frequently see Bargello patterns described as “stitches over 4 with a step of 2”.
There can also be blocks of stitches, so you might have 4 stitches over 4, step 2, then do 3 stitches over 4.
Your tension should be slightly loose, so that the threads just lay on the canvas. Do not pull your stitches tight as that will accentuate the holes and you don’t want to do that. A tight tension can also cause the canvas to become distorted.
Color
Choosing your colors for Bargello is half the fun!
What is Traditional Bargello? It depends on the time period you are looking at! Since about the beginning of the 20th Century, Bargello has usually been worked in shades of one color, sometimes with a contrasting color. For example, you might see a piece worked in shades of blue, with one red row. But if you go back in time, to say the 17th Century, you will see bargello worked in many different colors and frequently very bright colors. Back then stitchers were quite adventurous!
A few color terms that might come in handy:
“Hue” is the name of the color (red, blue, etc.).
“Value” is the degree of lightness or darkness of the hue.
“Shade” refers to the dark values of a hue. A shade is created by adding black to a hue.
“Tint” refers to the light values of a hue. A tint is created by adding white to a hue.
“Primary” colors are red, blue and yellow.
“Secondary” colors are between the primaries.
They are violet, green and orange.They are created by mixing primaries (red + blue = violet).
“Tertiary” colors are between the primaries and the secondaries, and are created by mixing a primary with its adjacent secondary (red + violet = red/violet).
“Complementary” colors are opposite each other on the color wheel, e.g. red/green
“Analogous” colors are next to each other on the color wheel, e.g. green/yellow green
A “monochromatic” color scheme consists of shades and/or tints of one hue. In needlework, this can be accomplished with different textures as well.
A color wheel is a good, basic tool to have. There are simple ones and complex ones. Whatever suits you is the best one to have! A color wheel can help you decide on color schemes, let you know if you are getting too far afield from your original concept, show you a new concept! The more complex wheels, such as a Quiller wheel, go into more subtle colors and mixes.
Miscellaneous Odds & Ends
For Bargello, count threads (not holes).
Whenever possible, come up through an empty hole and go down through a full one. This will prevent distortion of the threads already on the canvas.
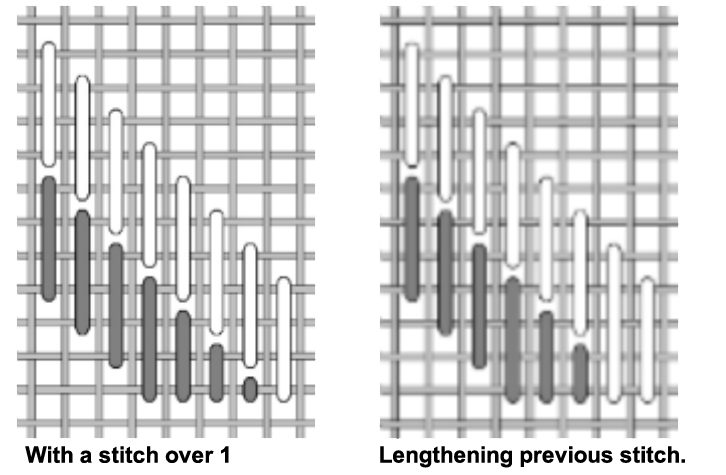
Whenever possible, do not work a straight, upright (Bargello) stitch over only one canvas thread. Rather, lengthen the previous stitch; this often requires paying attention to observe that the next stitch would be over one. Straight stitches over one tend to get lost, sink down, slip under a canvas thread. If you must do an “over one” stitch, it will usually look better if you go over it twice.
Beginning & ending threads: You may use a waste knot every time, or just for the first few rows. You may also leave a long tail to be woven in later. Once you get several rows in, you can bury your threads in previous rows. A Bargello Tuck is recommended: Run the thread under 6-8 stitches on the back, then turn and, skipping the first one, run it back under the same stitches. If you are using a “slippery” thread, pierce the thread on the return trip, and you may want to make another trip just to be sure! (Rayon threads, in particular, must be anchored very securely or they will sneak their way out!)
When stitching Bargello rows, you will get more even coverage if you change direction on every row. I.e., if your first row is from left to right, make the second row from right to left. This will give you more even coverage on the back of your work. Try it on a doodle canvas and you’ll see!
When stitching Bargello rows, you will get more even coverage if you change direction on every row. I.e., if your first row is from left to right, make the second row from right to left. This will give you more even coverage on the back of your work. Try it on a doodle canvas and you’ll see!